
Did you know that how you approach and handle a microphone can dramatically affect your vocal ability? Yes, it can! For this episode, I give you specific mic techniques that matter for several different live performance situations, including holding the mic in your hand, using stands and singing while playing instruments. Let’s dig in!
Listen and Subscribe…
Watch Episode Video…
Text plus other videos…
The right mic techniques can increase your vocal control, strain-free access to your lowest and highest notes, precision of pitch and rhythmic pocket, execution of vocal licks and runs, degree of tonal resonance, and can even raise your impact on your audience.
Before I start giving you the techniques, let’s ask the question:
Why and how can mic technique make such a difference?
Great question! It’s because how you hold, stand, or sit at a microphone will affect three things: breath, throat channel openness, and performance impact. Let’s break these down.
Breath
The mic techniques I’m about to teach you get your head balanced over your tailbone, causing the bottom of your rib cage to widen, which widens and stretches your diaphragm like a taut drum head or trampoline. The wide diaphragm gives you breath control and helps you bring your breath support from low in your pelvic floor instead of at your rib cage.
Your engine that powers and protects your voice the best is a controlled and confident compression breath centered in your pelvic floor, instead of uncontrolled wind that blows your vocal cords apart.
Throat Channel Openness
Nobody enjoys feeling their voice or hearing somebody else’s voice coming from a tight throat. When the openness of the throat channel is constricted, you sound and feel limited in many ways. Your straining voice gets tired easily, and you’re vulnerable to vocal damage.
Mic techniques that I’m about to show you can help you pull your throat open instead of pushing it tight, no matter how loud or soft, high or low you want to sing. When your voice has access to this freedom in your throat, it can choose how and where to open the contours of that channel for the different sounds you want to make, and do it with no strain.
Performance Impact
The truly successful performer’s brass ring is this:
to be able to authentically and passionately deliver the message of the song and get the response or impact that you want.
This is what gives your voice value. With compression breath and a free throat, your voice feels and sounds great letting you focus into message delivery mode instead of worrying about how your voice is going to work. When that happens, your stage presence goes through the roof!
One more question that I’d like us to consider before we dive in:
Do you have to use good mic technique ALL THE TIME?
Heck no!!
If what you’re singing isn’t difficult and you’d like to make a grand gesture or take a subtle stance for conversational or stagecraft effect, it can be great fun and effective to use the exact opposite of good vocal technique. In fact, I call it ‘deconstructing vocal technique’. But for your best singing and definitely when going for the edges of your range and your so-called ‘money notes’, it’s best to use these techniques!
OK, here’s my first suggestion for using a microphone to raise your vocal ability:
PRACTICE IN SITU
When you practice good mic technique into muscle memory, your posture and your movements of head, arms and hands can help get your breath and throat right without you having to think about it. In fact, this is why I highly recommend practicing with a mic or mic-like object in the simulated situation you’ll be when you perform. If you don’t know, ask… will I be using a mic or will I be singing acapella? Will I be holding it, or will the mic be on a stand? Will I play an instrument while singing? Then practice that way.

Practicing in situ also should include the shoes you’ll wear on stage if they’re very different than your normal footwear. The type of heel is especially important for your body to memorize, because it will affect your breath and stability.
Second suggestion:
EAT THE MIC
In other words, for live performance, keep the mic screen close to your mouth when singing.
Here’s the reason: No matter what your live performance situation, you’ll almost always be using a dynamic microphone, which is designed to pick up sound coming directly and closely into it from the front, minimizing other extraneous noise from around it. If you get very far away from it, it won’t pick up the full bandwidth of your voice. You’ll sound thin, or the mic may barely pick your voice up at all. You can move it back a little, just don’t move it too far. Don’t actually touch it with your lips, either, because if it’s too close, your sound will be muddy.
Now, here are some specific mic techniques for different live performance situations. Let’s start with…
WHEN THE MIC IS IN YOUR HAND
Let’s start by talking about how to hold it.
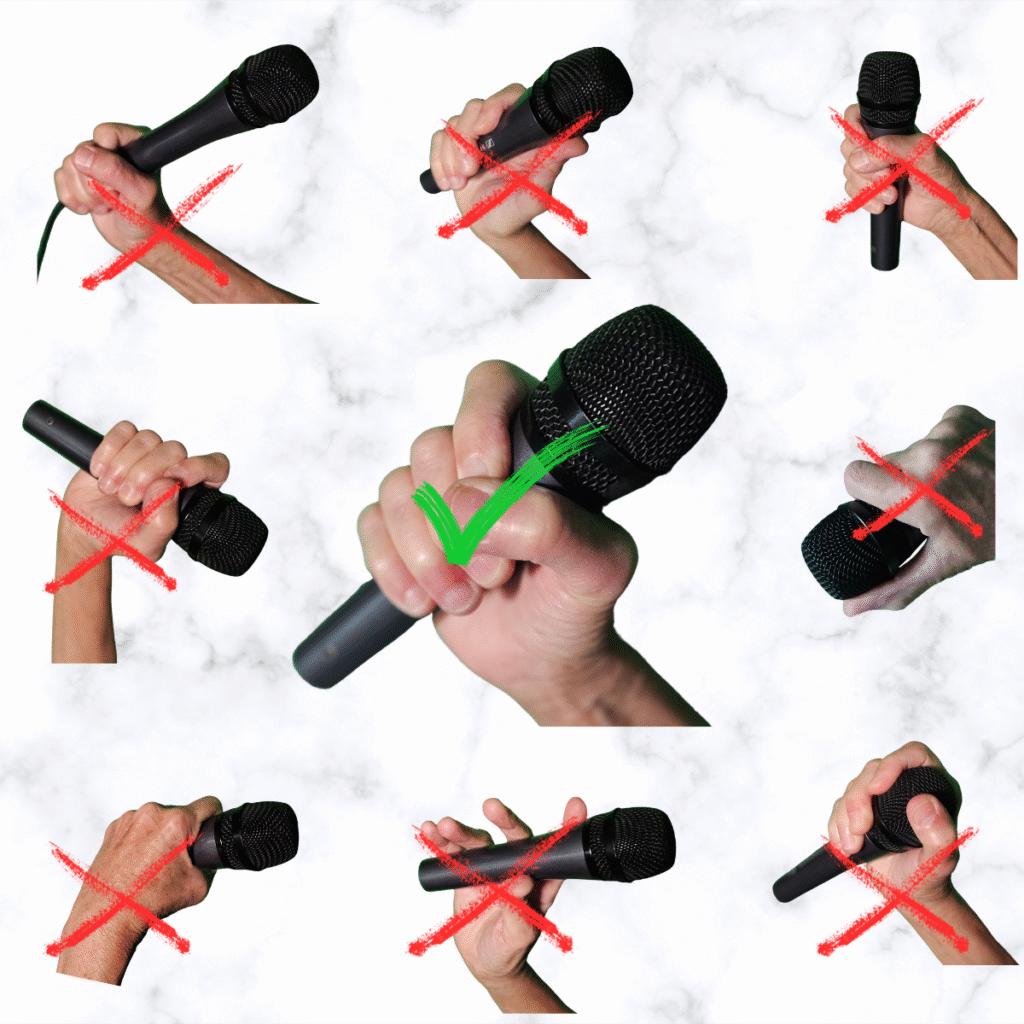
- Don’t hold it perpendicularly like an ice cream cone, or butt end up! Hold it butt-end down 45 degrees. This gets you in line to pull your voice open, and sends your sound through the front of the grill instead of the sides of the mic. Do an experiment… hold your mic butt end up and notice what happens at the bottom of your ribcage. It collapses a bit, doesn’t it? Now drop the butt end down to 45 degrees Make sure not to lean forward. Your ribcage expanded a bit, right? Your head probably moved back, too.
- Don’t hold it like you’re drying your fingernails! Notice when you do this for a while, tension can crawl all the way up your arm to your shoulder and neck. That’s not good for your voice. If you’ve got a strong hand and you’re used to it, you might press really hard with between your thumb and fingers and get by with it like Sarah Brightman does, but it’s just not a good idea because that tension does go all the way up. Instead, loosely grip it with your full hand, lightly squeezing as you articulate lyrics. You can even slightly twist to one side. Do that with a 45 degree tilt of the mic and notice you get just a bit taller, widening your ribcage and your throat channel and backing your head over your tailbone in the process.
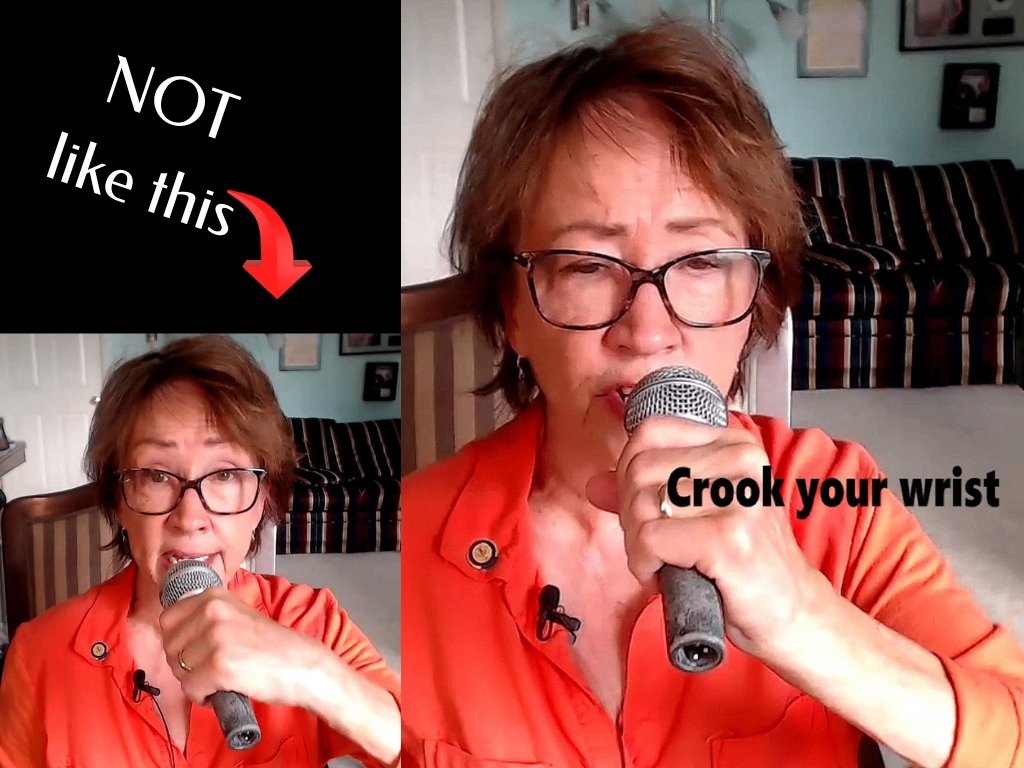
- Oh my gosh. I’m adding this because I just had a breakthrough in a vocal lesson with a student that reminded me of another thing when it comes to holding a mic in your hands. Don’t hold it with your wristbone buckling outwards, even if you’re holding the mic at 45 degrees. If your wrist is like this, your arm is going to get heavy, and tension’s going to crawl up your arm, up to your shoulder, up your neck, and it’s going to weigh down your rib cage. That’s going to cause all kinds of sneaky problems with your vocal control. So instead, here’s what to do: Crook your wrist just a little bit inwards. You don’t want to freeze it, just put a loose crook in it. And then you’ll notice that the weight is so much lighter on your arm, and you’re not going to weigh your rib cage down. Why does this occur? If you’re not familiar with holding a mic at all, your wrist may have no idea what to do at first. So just go ahead and cut to the chase: crook that wrist!
- You can change hands from time to time, but don’t switch the mic back and forth between your hands too much. It’s distracting to both your audience and you.
- Don’t lift your chin up high! If you want to lean back for dramatic effect, do so from your hips and legs, and keep your head in line with your neck.
- I call this one of my ninja vocal tricks: Re-pull your mic at cut-off to control the end of a long sustained note. If you end with that quick little re-squeeze of the handle, you’ll be able to control the end of your line just like you want to, instead of wishing it luck.
- If it has one, check the mic’s on/off button. And when backstage or walking up the stairs to the stage, remember to assume all mics are live! Watch what you say.
- And in honor of sound techs everywhere… Never point the head of the mic towards a speaker – which will cause horrible feedback.
When holding a mic in your hand, here are some techniques that work great for your highest or most difficult notes:
- Flexibly and levelly pivot your head down and pull back to power your voice open.
- Squeeze your butt, not your throat, or press your heels down if you’re standing, for those money notes!
- Temporarily squeeze the mic handle, but don’t let the squeeze go up to your shoulders and neck. If done properly, your hand squeeze should cause your ribcage to widen, not tighten.
- Don’t pull that mic away very far… I’m going to reiterate this… to control your volume. You can pull it away just slightly, but if you’re still too loud, you need to back off your breath pressure instead and rock your head down and pull back more.
- Use both hands to squeeze the mic for particularly challenging notes or passages. Both hands on the mic will most stably widen your ribcage and balance your head levelly over your tailbone or heels for compression power.
- Okay, one more thing: You can use the hand that’s not holding the mic to help your voice, too.The way you do that is to make sure whatever this other hand is doing is not crunching your ribcage in or throwing your head forward. You can press your hand into your lap, or simply put it behind you with your elbow behind a little bit. Or, make the grand gesture. But whatever your hand is doing, it should cooperate with your mic-holding hand to keep your rib cage open and your head balanced over your tailbone.
If you’d like to see me demonstrate mic-in-hand techniques, check out this short video I did in my office of a song I wrote with my husband for our last album:
If you want to see a legend use these ‘holding-the-mic-in-your-hand’ techniques, check out Celine Dion’s performance of Power of Love. Be sure to look for the rock-down pull-back moves she uses on her big notes:
OK, now on to the next performance situation…
WHEN THE MIC IS ON A STAND AND YOU’RE STANDING
- If it’s a straight stand, position yourself with your feet almost straddling the base of the stand so your head has to go back over your tailbone or your mouth will hit the mic.
- If it’s a boom stand, all the better; you can move your feet in even more, maybe one foot farther forward to give you greater stability. Make sure the cord is hung over the nut so you’re not going to get in the way of it, and position the crossbar so that the mic is in line 45 degrees in front of your mouth.
- With either kind of stand, you can put your hands on the vertical pole and/or crossbar to stabilize your stance and widen your ribcage/throat channel. You can even get showy with extreme stances. But the important thing is to make sure that your rib cage is being widened, no matter what you’re doing with the stand.
Next performance situation:
WHEN THE MIC IS ON A STAND AND YOU’RE SITTING
You can use the following techniques, whether you’re sitting on a high or low stool, a chair, a couch, or anything else.
- The most important thing is that you position yourself and your foot in such a way that you can stay flexibly tall with your head balanced over your tailbone. Don’t lean into the mic. When you do that, you instantly sabotage your breath control, and it’s a shame because all you have to do is move a little bit forward and move the mic towards you.
- Think heart first, not nose first. You can again cross your legs if you want to use them to straighten your torso flexibly tall, but better yet, put that foot all the way down on the floor so that you can power your voice from there. Definitely don’t sit with your legs up on the chair rungs or stool rungs and slump.
- You can put a hand or both hands on the mic stand and squeeze as you articulate lyrics for power, but do it in such a way that you lift your torso up and pull back, instead of bearing down on the stand, causing you to slump.
- You can also press your hands into your thighs to lift your torso up as you pull back. Again, don’t lift your chin when singing. Instead, rock down, pull back. But if you lean back, lean back from your hips.
Next performance situation:
WHEN YOU ARE SINGING AND PLAYING AN INSTRUMENT
- First of all, use a boom stand. If you do have a straight stand, use a gooseneck attachment so you can bend it over because a straight stand is going to make you lean forward over your instrument to get to the mic, and you’ll lose that stretch in your rib cage into your throat.
- Sit in such a way that the mic head is almost between your mouth and the guitar. That way, you’re going to be in the right position to have great breath control and an open throat.
- Something else I like to do when I’ve got a guitar is put my foot on the ground, one foot all the way on the ground, which makes me feel like I’m almost standing. I use that foot to power my voice instead of using my rib cage at the top of my guitar. If you want to cross your legs, you can do that, but be careful not to cross them in a way that makes you slump. Cross them in such a way that you can pull up from there.
This is a video performance I did on guitar before I knew why what I was doing worked! See if you can catch some techniques I used…
And here is a student of mine, Preston James, doing an amazing performance singing while playing guitar on his song ‘Fences’:
- If you’re working with piano, then consider having a boom stand that comes in from the side. I have worked with far too many that came over the front and sagged down as I performed, which makes you bend forward and lose breath control. If you have to have a boom stand that comes over your piano, just make sure the connections are screwed on tight so it doesn’t sag on you.
- Move in close enough to the piano so that you can see your hands, but your head is floating levelly tall over your tailbone, and your mic is 45 degrees. When you’re going for something, you can do that twisting and pulling and rocking your head down and back the same way you can with guitar, without getting your mouth too far from the mic.
Okay, here’s a song I wrote with my husband for our last album that I performed on piano. See if you can spot some of the techniques that we just talked about:
And here’s a legendary performance by Aretha Franklin demonstrating her piano singing technique. As a bonus, she then takes the mic off the stand for some hand-on-mic technique mastery:
Now on to our last performance situation:
When you temporarily need to hold (not play) an instrument while singing
So what if you are performing with an instrument you have to hold, but there are places where you want to just sing, not play. My vocal student Jon Mailender was in this situation for a tour with Bruce Hornsby where he played violin and also sang background vocals, which you can’t do at the same time. If you’re playing something that you temporarily need to hold while you’re singing like a fiddle, mandolin, or horn, then hold or position the instrument in front of you with both hands so that you use it to balance yourself back over your tailbone. If the instrument has a strap you’re wearing over your shoulder, you can still subtly put your hands on it and use it to widen your chest and throat. It’s kind of like squeezing the mic. Holding your instrument like this actually helps you with breath control rather than weighing you down at your rib cage. Then you can bring it back into position and play away.
Want some help with this?
And finally, please do remember that you don’t have to use these techniques I’ve suggested all the time. The only thing to ask yourself about your particular live mic technique is this: Does it work to make your voice sound and feel like you want it to? If so, by all means keep doing it. But if you’d like to explore some techniques new to you that could make a difference in your voice, schedule a vocal lesson with me at this link for my booking calendar. If you’re serious about raising the level of your vocal ability for live or studio performance, I think you’ll be thrilled with the results of the training!
Leave a Reply